Getting started with Pelican
• Published on May 9, 2020 by zphoenix
TL;DR : Pelican is a static site generator written mainly in Python and why we call it static is because it doesnt require any database and its very simple.
Pelican takes the content in mostly as text or markdown format, push it to a template and outputs as a HTML and CSS page, sometime even JS if added in the template. Pelican is simple and lightweight unlike other websites build in HTML or CSS or PHP which have a complex structure.
Prerequisites
Contents
- Installations
- Configuration
- Create a repo/project in gitlab
- Initial setup to get Pelican
- Write the first blog
- The OUTPUT
- Thinking to host Pelican?
- THEMENATION - Adding a theme
- Futuristic
- Conclusion
1. Installations
-
Install Python
sudo apt-get install python3.6or
sudo add-apt-repository ppa:deadsnakes/ppa
sudo apt-get update
sudo apt-get install python3.6 -
Install PIP
sudo apt install python3-pip
sudo apt install build-essential python3-dev -
Install Git
sudo apt install git#if any error persists try
sudo add-apt-repository ppa:git-core/ppa
sudo apt update
sudo apt install git -
Install Virtualenv
sudo apt install virtualenv
virtualenv pelican
2. Configuration
-
Configure Virtualenv
It creates an environment and its suggested to overcome conflits when multiple projects in a machine and libraries issues.
virtualenv pelican
cd pelican
source bin/activate
Output
(pelican) z@zphoenix:~/pelican$
3. Create a repo/project in gitlab
-
a. Sign Up
Register here : https://gitlab.com/users/sign_up
So we have two options
-
Either get the pelican site running on
your_username.gitlab.ioor
-
create a group and riunning on
your_groupname.gitlab.io
Here lets follow group method.
-
Create a new group
Firstly lets create a group & click the link to create a new group : https://gitlab.com/groups/new
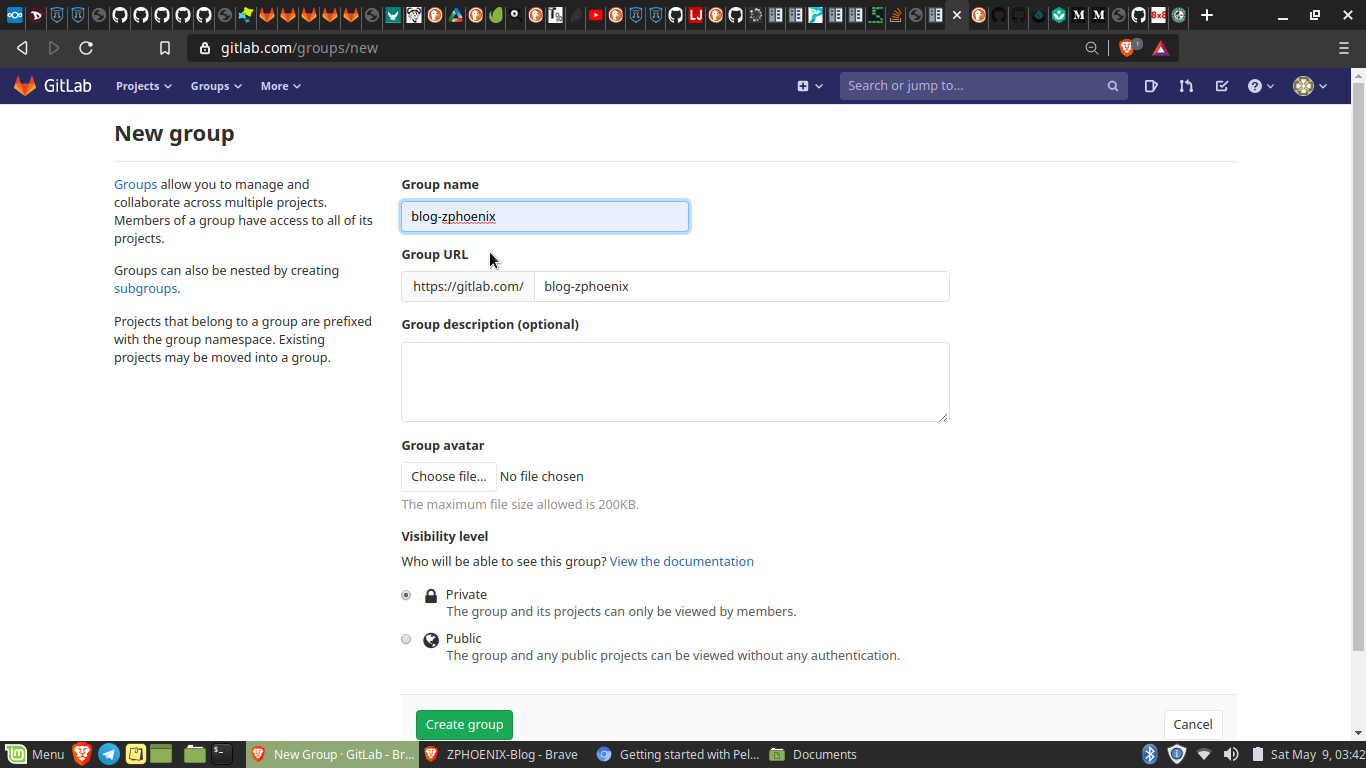
_Note : _In the place of
zphoenixhave yourusername.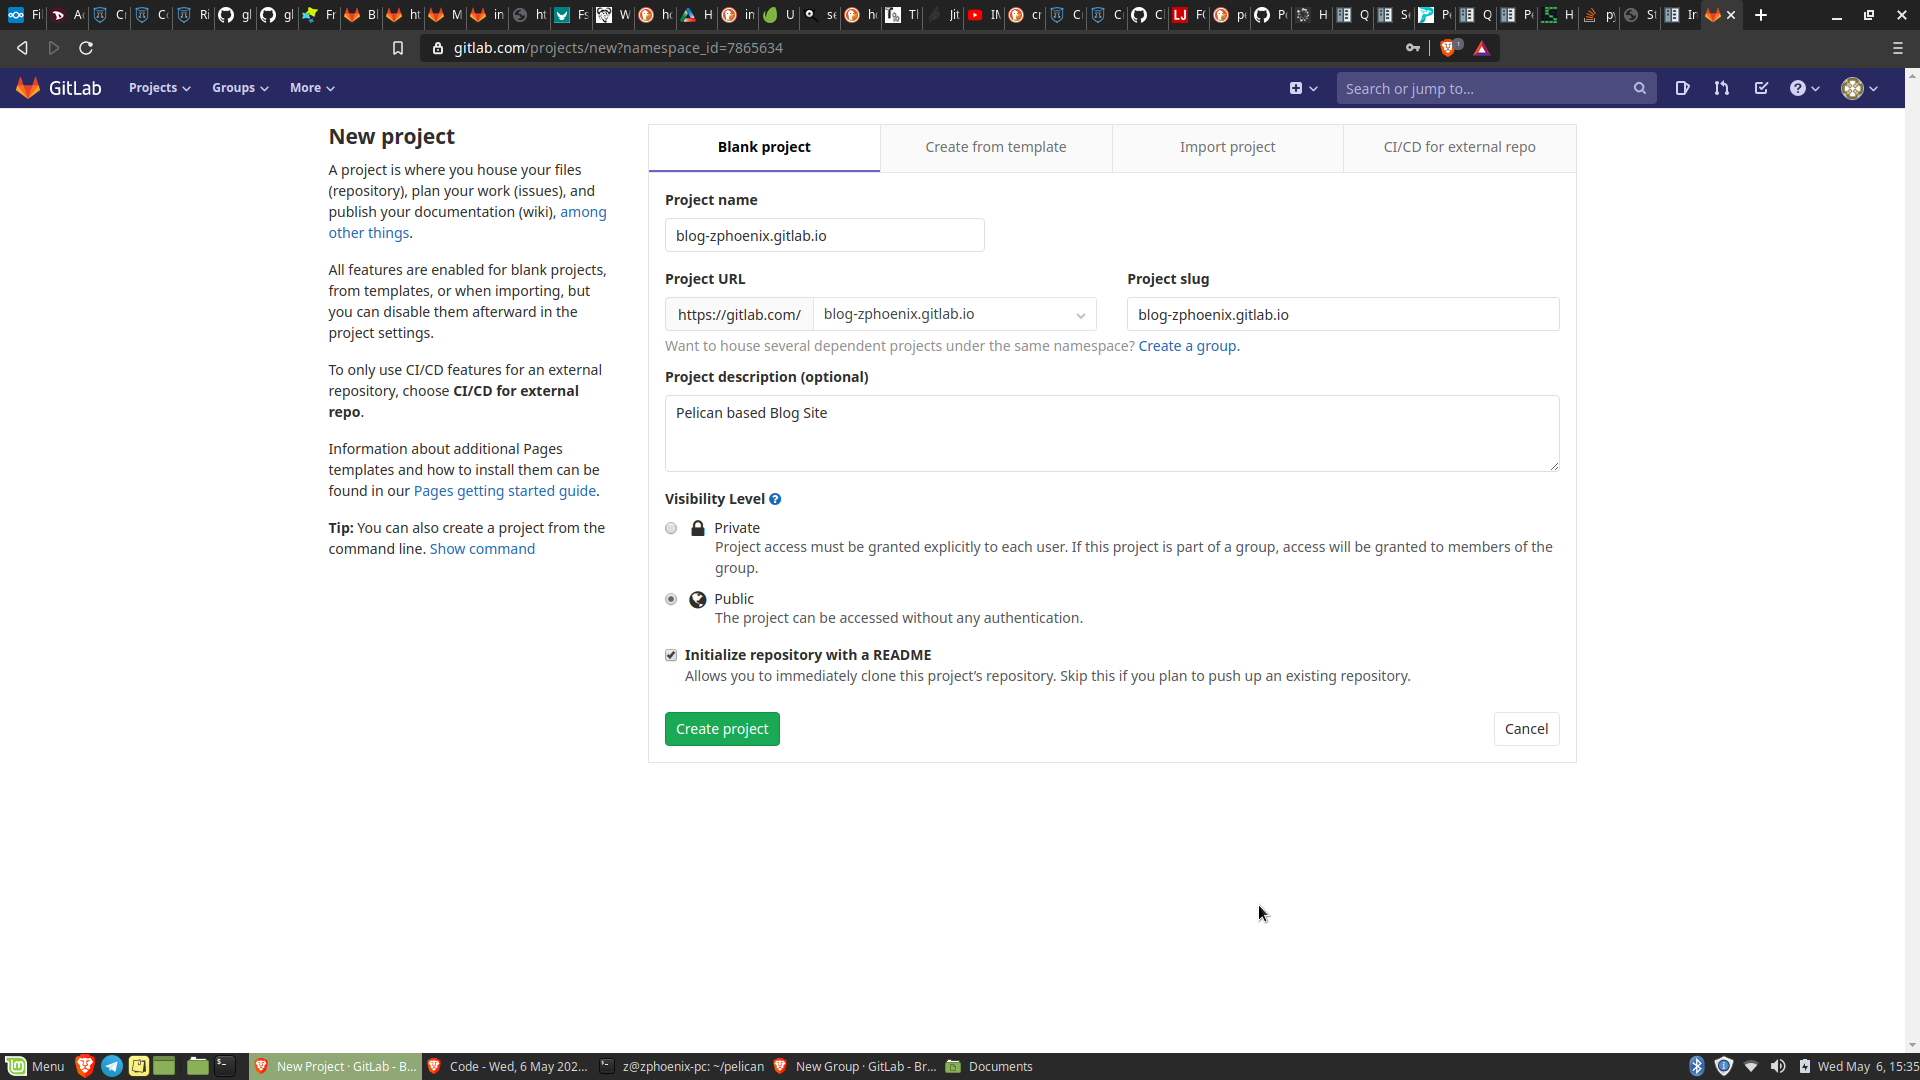
So we create a new project under same name
blog-username.gitlab.io -
-
b. Clone the project
Lets clone the project and start working on it.
- Click on
Clone& Copy the ssh key - Open Terminal
ctrl+shift+t -
Clone the repo
git clone git@gitlab.com:blog-username.gitlab.io/blog-username.gitlab.io.gitOutput
(pelican) z@zphoenix-pc:~/pelican$ git clone git@gitlab.com:blog-zphoenix.gitlab.io/blog-zphoenix.gitlab.io.git
Cloning into 'blog-zphoenix.gitlab.io'...
remote: Enumerating objects: 3, done.
remote: Counting objects: 100% (3/3), done.
remote: Compressing objects: 100% (2/2), done.
remote: Total 3 (delta 0), reused 0 (delta 0), pack-reused 0
Receiving objects: 100% (3/3), done.
- Click on
4. Initial setup to get Pelican
-
Installation
pip install pelican
pip install markdown -
Get a basic site
pelican-quickstart
Output
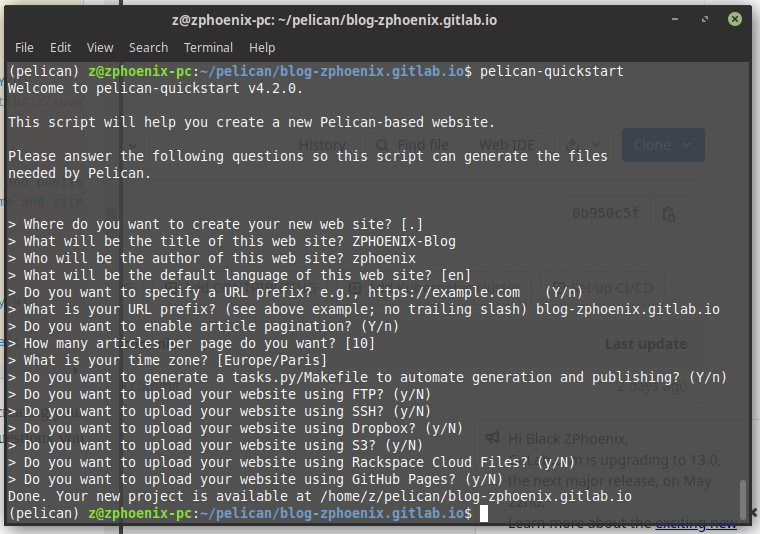
Note : This command generates all required files basically basic pelican structure, there will be questions poped up, makesure you give URL Prefix as ‘blog-username.gitlab.io’ and leave rest as default values [ (Y/n) have default value as Yes and (y/N) is vice-versa ]
5. Write the first blog
-
Create a blog post
cd content
touch firstPost.md#To create the file
nano firstPost.md#To open the fileAdd these below contents
Title: My First Post<br>
Date: 2020-05-08 18:59<br>
Modified: 2020-05-09 19:30<br>
Category: Python<br>
Tags: pelican, publishing<br>
Slug: my-first-post<br>
Authors: zphoenix, GLUG PESCE<br>
Summary: Short version for index and feeds<br><br>

 This is the content of my super blog post.
Note : Reference - https://docs.getpelican.com/en/3.6.3/content.html and Slug is nothing but filename without space, makesure to give - instaed of ` ` #space
Once you are done press ctrl + s to save and ctrl + x to exit from nano editor.
-
Convert post into html
pelican content
make htmlTry to check if public folder is created, if that has generated proceEd, else cross check and try again!!!
6. The OUTPUT
Inorder to preview the firstPost.md - The blog post in your terminal type
make serve
Now open http://localhost:8000 in your web browser, your very first pelican based blog site is hosted locally :)
Output
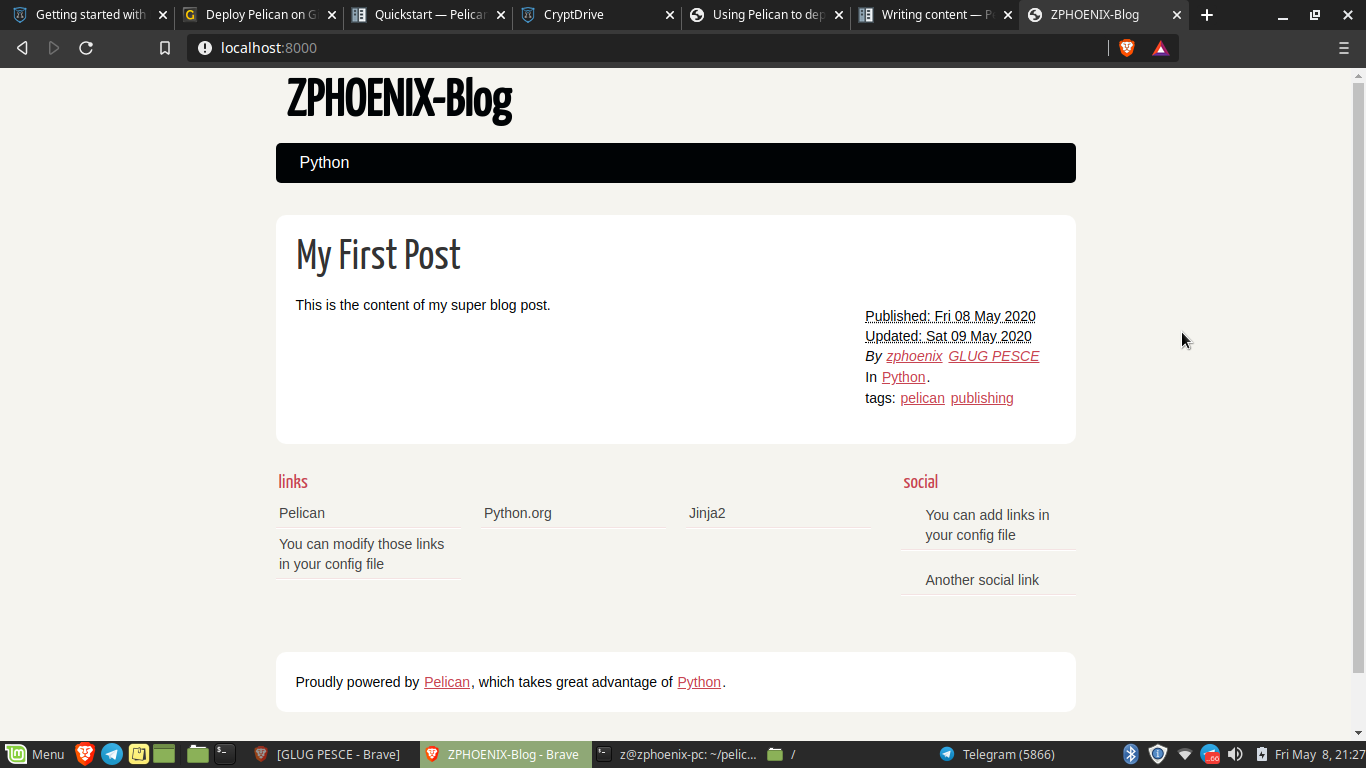
Hurray !!!! Congratulations here goes your Pelican BLog Post
Note : To preview in our localhost you can even cd into public folder and type
python -m SimpleHTTPServer#if using Python2python -m http.server#if using Python3
7. Thinking to host Pelican?
Lets get three important files
But before that we have to make three important changes, as gitlab requires public directory and it helps in hosting properly. In or case its output so we should change it from output to public.
- Open to publishconf.py and pelicanconf.py file and at the end add the below codes
OUTPUT_PATH = '/public' -
Open to Makefile and search for
OUTPUTDIR=$(BASEDIR)/outputin that line change output to public like below
OUTPUTDIR=$(BASEDIR)/public
Now back to business, so lets create requirements.txt, .gitlab-ci.yml and .gitignore. -
requirement.txt
But before getting into it lets try do get a requirements.txt file. Why is requirements.txt is important?
We all may run different python environments and with different versions and we primarily generate and share requirements.txt file to make it easier for other developers to install the correct versions of the required Python libraries/Packages to run the Python code that we have written.touch requirements.txt
nano requirements.txt
Paste the below contents inrequirements.txtmarkdown pelican -
.gitlab-ci.yml<hr>
It is a configuration file that will build and deploy or host our website in Gitlab Pages.
touch .gitlab-ci.yml
nano .gitlab-ci.yml
Paste these content in.gitlab-ci.ymlimage: python:3.6-alpine pages: script: - pip install -r requirements.txt - pelican -s publishconf.py artifacts: paths: - public/ only: - master -
.gitignore<hr>
Lets create a .gitignore.
touch .gitignore
nano .gitignore
Paste these content in.gitignore/public *.pyc -
Lets PUSH !!!
Now lets push the pelican source code.
git add . git commit -m "First Commit to add Pelican Blog Site" git push -
CI/CD Configuration<hr>
So go to CI/CD - > pipeline -> jobs
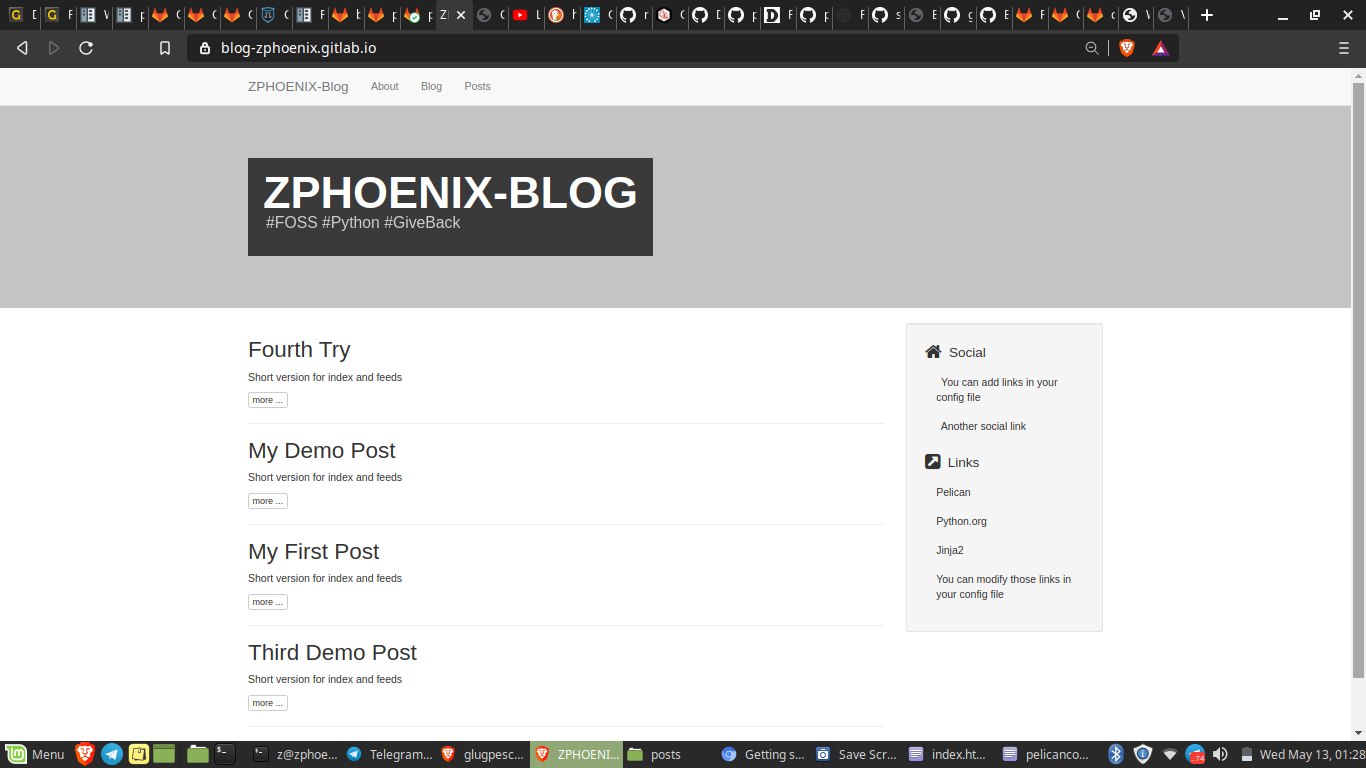
If the status of your job ispassedthen your Pelican based Blog Site you will find it atblog-username.gitlab.io

So your dream come true your very own Blog site LIVE !!! - Check out it here - blog-zphoenix.gitlab.io
8. THEMENATION - Adding a Theme
-
Get the Theme and Plugin
So there is huge collection of Pelican Themes, amongst it i liked pelican-bootstrap3.
cd ..
pwd
/home/z/pelican
#Clone Theme
git clone https://github.com/getpelican/pelican-themes.git
Now cd into pelican-themes, copypelican-bootstrap3intoblog-username.gitlab.iodirectory#Clone Pelican Plugin
git clone https://github.com/getpelican/pelican-plugins.git
Now cd into pelican-plugins,search and copyi18n_subsitesinto a new subdirectory calledpluginsinblog-username.gitlab.iodirectory -
Configuration
Now edit peliconconfig.py file
# THEME CONFIG THEME = 'pelican-bootstrap3' JINJA_ENVIRONMENT = {'extensions': ['jinja2.ext.i18n']} PLUGIN_PATHS = ['plugins'] PLUGINS = ['i18n_subsites'] BANNER = 'assets/banner.jpg' BANNER_SUBTITLE = "Your banner message here." STATIC_PATHS = ['assets'] -
The file structure [ A cross verification ]
The filestructure is very simple
blog-username.gitlab.io | | pelicanconf.py | pelicanconfig.pyc | publishconf.py | Makefile | test.py | .gitlab-ci.yml | .gitignore | requirements.txt | README.md | |---content | |---assets | | | banner.jpg | | |---img | | | |---posts | | | firstPost.md | | | secondPost.md | |---pelican-bootstrap3 |---plugins | |---i18n_subsites | |---public -
Lets deploy
cd blog-username.gitlab.io
pelican content
make html
make serveOUTPUT
9. Futuristic
- Add more post - Start writing blogs buddies
- Get a new theme for your site Try a different one, try to experiment with themes :)
- Add few javascript tricks and let me know, im still learning JS !
10. Conclusion
Having said this blog is just a kickstart and its only your try will fetch you a great work out of you. Pelican is python based and its so easy to work and deploy too. And ifou are looking for a ready repo.
In the virtue of getting writing this blog here is the OUTPUT : https://blog-zphoenix.gitlab.io/
If any errors do ping me or if you had a better pelican hosted share it with me, there will be something that i can learn from yours.
- Telegram : @blackzphoenix
- Email ID : zphoenix@disroot.org
- Mastodon : zphoenix@fsmi.social
Reference
- Git and Git Configuration
- Pelican Documentation
-
Pelican examples on Gitlab :